What data recovery tools to buy if you want to start a data recovery business?
Free video data recovery training on how to recover lost data from different hard drives?
Where to buy head and platter replacement tools at good prices?
Data recover case studies step by step guide
I want to attend professional data recovery training courses
So far in the hard disk market, we can find many western digital hard drives with USB interface only. You can seldom find some data recovery tools which are able to operate on their firmware section, if such kind of hard drives are not detected due to firmware corruption, it’s hard to restore the drives and recover the data.
How to work on the firmware of western digital hard drives with USB interface only? This is a common problem met by many data recovery experts even if you have good data recovery tools or even if you have USB to SATA or IDE adapters.
Here we take HD Doctor suite as an example to explain how to connect USB-only western digital hard drives with HD Doctor suite. As everybody knows, HD Doctor suite is specially designed to repair firmware failures and restore hard drives, HD Doctor contains HD Doctor for Seagate, HD Doctor for WD, HD Doctor for maxtor, HD Doctor for Hitachi and HD Doctor for Samsung. Therefore, you just need to connect the USB-only WD drives to HD Doctor for WD and then you are able to handle the firmware section.
The following are some simple steps:
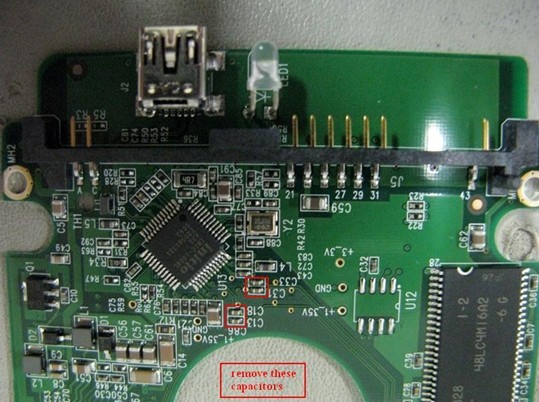
Step 1 Remove the PCB from the drive.
As shown in the picture above, we need to remove these 4 capacitors from the PCB carefully. It’s suggested that you can remove them with a hot air gun.
Step 2
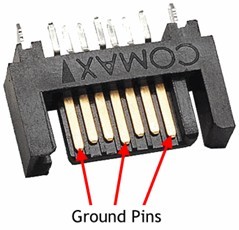
Find a SATA data transfer interface from a SATA drive. You don’t need to care about the model number, the firmware version or PCB number. Any hard drive with a SATA interface will do.
It can be told from the picture that the longest 3 pins are the ground pins, the other four pins belong to SATA data pins. We need to connect them together later.
Step 3:
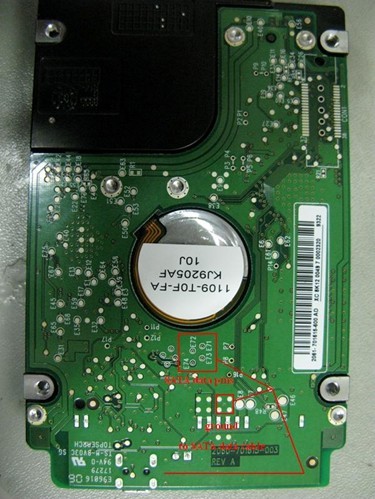
From the back side of the PCB, we can see the pins E71, E72, E73 and E74 belong t SATA data pins. And the other four pins marked with a red square belong to ground pins.
Step 4:
Now connect each pin to their corresponding one. Ground pins to ground ones, SATA data pins to SATA data ones.
After that, you can connect the SATA interface to SATA to IDE adaptor, and then the data can be transfer correctly.
Last but not the least
The USB interface also needs to be connected to your PC as the power supply. Otherwise the drive will not spin at all.
Now we can diagnose or restore the WD hard drive as usual ones by handling the firmware section.
Many thanks to Ann LeFlore who devoted a lot to the picture and idea of this post.
If you wish to learn more about SalvationDATA data recovery tools, please see How do you like SalvationDATA data recovery tools?



24 Comments
this post is very usefull thx!
great post as usual!
Very interesting. Thanks for the tip!
I see that in this example an older type if WD-drive is used, the newer ones have another SATA-to-USB bridge-chip on it, an INIC1706E, which also provides for an encryption (AES128bit). My question is if this solution totally goes around this chip, or that the chip still is used. Because if it goes around this chip, we can only access encrypted data, which might not be (easily) recoverable.
Next this newer type of PCB does not give a E74, but a E75; is this the same connection?
Very interresting, but I miss the notification if E71 is Tx+ or Rx+. I guess it is Tx+, which will lead to the next connections:
E71 – Tx+
E72 – Tx-
E73 – Rx-
E74 – Rx+ (E75???)
Tomorrow (with permission of the customer) I’m going to try this, and post it here if it works.
BTW WD head alignment is not with a tool
you do not need a tool to do this one
you just need to understand how the drive works and you an eralign all heads on it very easily
I think that the enginers cuold help to do this one inside the program it is hanging on the second step when the ROM is reading the EEPROM and trying to initialize the or position the actualator along the data storage track so that it can go onto the third step and read again the ROM + \EEPROM to arrive at the reserved sectors to read them and part of the program inside to initialize the drive
it is never reaching 3rd step in the process and it is hung on the second step in the process
you can learn a lot from them and especially in understanding the structure and make up of the interal drive and what it does
it would be nice then if the progarm could encorpurate this into it for aligning heads in the drive
it is in the initialization process is why it clicks
hands on the second step of the rom read to the eeprom to move the head to the servo controller so it can posiition the head along the data storage track
can not position the head in the beginning when it is performing second stage of read process
most of the time on the 3 clicks and spin up and down and go ready is becasue it is not able to read the data storage track
it has not even gotten to the SA on this one yet or the reserved tracks as they are called
if you can not get the head to align correctly to read the data storage tracks it will click and send a signal to the preamp to try and calibrate this one to read it
the drive fly height has an issue on this one and this is the frist data storage track and it is determined by the servo writer and the first head is set and the second head and so on has to servo off this head to make it work
this one is done when the servoing of the drive is put together
you have to know how the servoing is set then after how the boot sequence is set and then you can figure out the rest of it
becasue it is possible if they really want to add ROM and RAM features to the WD doctor so you can do head maping
the head map is located in a SA Module and also the EEPROM 000A
you can use this to alter the head maps of the hdd
second off if your support team can add an alignment feature to the program for aligning heads
it can be done internally in the hdd to align your heads
[…] >>You can firstly learn the important firmware modules here >>PCB to identify different type of western digital hard drives >>How to Connect western hard drives with USB port only to professional hdd repair tools to pe… […]
Hi all, I’m a little bit confused.
The four pins marked with a red square have to be connected with the pins 1, 4 and 7 of the SATA interface.
Ok, but if we have 4 pins, and in the SATA interface there are only 3, how I have to connect the 4 ground pins exactly?.
Have I to connect all ground pins?
How I have to connect them?
The rest I think that is clear.
71 (Tx+) with the second pin in the SATA interface.
72 (Tx-) with the third pin in the SATA interface.
73 (Rx-) with the fifth pin in the SATA interface.
75 (Rx+) with the sixth pin in the SATA interface.
Thanks in advanced.
Where do you connect the power on this pcb?
http://picasaweb.google.com/puzanovhdd/dPrmmI please check this link and it has good pictures showing the connections and details for the USB drive repair
awesome stuff guys. my hd is not broken but i still want it as internal sata. can i just solder the connections for sata and have it work that way? ofcourse id still have to use the usb plug for power but thats fine. i just want sata working
I have read this over and over and tried to gain access to the photos on Comment # 9 which are not there anymore. Can someone please tell me where I can find these please.
I tried up update my anti virus, which in return corrupted all of my drivers for mouse keyboard and back up hard drive. So I put in the only disc that came with the computer and was going to reinstall them, but it was a recovery disc. While it was doing whatever I noticed it said backing up files. When I got into the computer ….everything was gone…. So my question is… Is there any way possible to get any information back? At the moment there’s something wrong that it won’t even let my USB wireless internet to connect, so I can’t download anything. You always hear that even though something is deleted it can still be found….is that the case here too? Any help is appreciated. Thanks!
@Matt, what’s your email i’ll send a copy to you.
Hi nzo17, I also cannot get access to the pictures. I would really really appreciate any help because my 740gb wd passport is failing on me and I absolutely cannot pay $500 for data recovery. I am not experienced in this field at all but am very eager to try everything in my power to retrieve my data! This post has been tremendously helpful because there seems to be almost no easily available help on this topic elsewhere. Please help clarify further anything that you can. Thank you in advance!
Hello,
@ onDate: Sorry, i don’t can see your pictur.
My Problem is. The HDD is as “unknow device” identified.
I don’t can take a another electronic, while the rev. is not identified.
Is the Data on all electronic identified? (E71/72/73/75)
How i to connect the power on the electronic?
So what are those pins in the 12-pin header doing? I’ve read stuff around the web saying that you can’t connect to SATA with them– but why not? They don’t correspond to SATA pins OR USB pins? Then what are they for? Feel free to e-mail me if you have access to my address.
can someone pls upload the pictures again? or mail them to il@protec.dk
thanks
Please email the pics to valamas@gmail.com thanks
[…] For reference I am trying to follow this page: How to connect and data recover from a WD HD […]
Does anyone know how to recover the ATA password locked drives without any hardware interference? I am not a HDD specialist, especially in the hardware level, but software may do. Any thought on that one? Anyone?
[…] For reference I am attempting to stick to this page: How to connect and data recover from the WD HD […]
Nice translation of ACE manuals :D
Great information! I have been hunting for something such as this for a time now. Cheers!
[…] very complicated. Check this out. I don’t know why you’d want to go through all the trouble though… Answered […]
Please help me!
How to connect a PCB 2061-701285-100 AK, which works in a WD 800VE (S/N: WXE206758732); (P/N: WD800VE-00HDT0), (DCM is:HONTJHNH), and it is stamped with 2060-701285-001 REV A
What about the USB3.0 – Western Digital Passport Hard Disk Drives?
They have a different Chipset, different Traces and pinpoints all together…
Can someone please decypher the 12 pin connector on the back?
Or figure out what pinpoints will provide SATA Access.
Same here, help needed for a usb3.0 western digital passport hard drive is there a way to do the same thing to one of these. Thanks
We know there’s one new WD Repair tool which can deal with USB WD drives directly for firmware issue, you can visit the link here: http://www.dolphindatalab.com/product/new-wd-firmware-repair-hardware-dfl-wdii/